


DIY Beekeeper | Build it Yourself | Beekeeping Equipment | 26 plans to download for free
- GreenView Aquaponics Apiary
- Dec 2, 2015
- 4 min read

26 Build It Yourself Plans for DIY Beekeeping Equipment
Hive Equipment

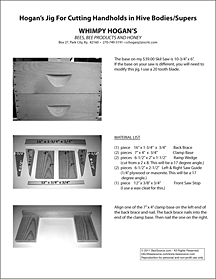


Bee Hive Handhold Jig (pdf)
Inner Cover for Langstroth Hive (pdf)
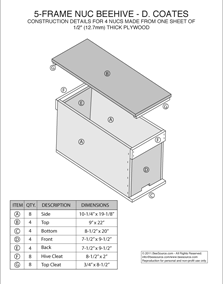


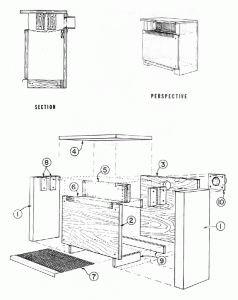
A nuc (nucleus) hive has all the features of a standard 10-frame hive except on a reduced scale. The nuc hive is used for making splits, swarm control, queen introduction, pollen/nectar monitoring, to name a few. This version is put out by the USDA
This plan gives details for making (4) 5-frame nucs from one piece of 1/2″ plywood – 4′ x 8′. A cutting layout diagram is included. Design by D. Coates.


This drawing covers how to build Dadant style frames to fit a Langstroth Hive.
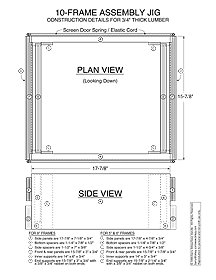
These plans are based upon information provided by Dave Verville, using 3/4″ lumber.
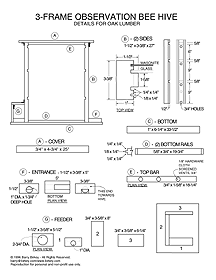
This drawing information is provided by Dave Verville and is made using Oak lumber.
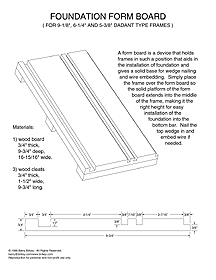
A form board is used to install foundation, nail frame wedges, and embed wires. It can be used for all three sizes (9-1/8″, 6-1/4″ and 5-3/8″) of Dadant style frames. Place the frame over the form board and the platform extends up to the middle of the frame, allowing the foundation to be easily nailed in place, frame wedge nailed, or the wire embedded.
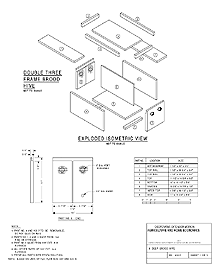
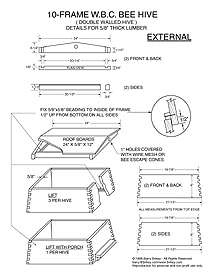
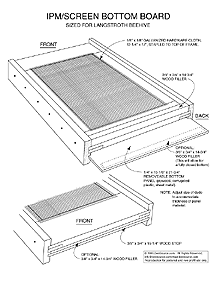
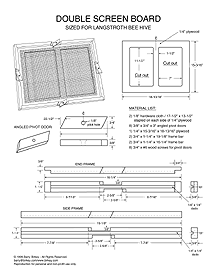
These Build It Yourself plans are sized for the Langstroth Beehive
The Double Screen or Snellgrove Board is a management tool that allows the beekeeper to make two queen hives, make multiple nucleus hives on top of a main hive, or divide the hive for swarm control. It has 8 entrances, top and bottom entrances on each side which can be opened or kept closed. Sized for a Langstroth Beehive.

A Slatted Bottom Rack is a ventilation board that fits between the bottom hive body and the bottom board (Langstroth Hive). It provides cluster space for bees, allows air circulation without allowing a direct draft on the brood, and helps prevent swarming.
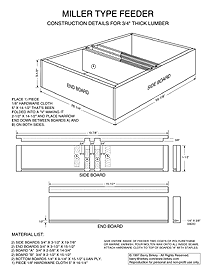
The Miller type feeder has the same outside dimensions as the Langstroth hive. It contains two feeding “trays” that can be filled with syrup. The bees can enter up the center crawl space and access both sides. Large amounts of feed can be given this way with no disturbance to the bees or the beekeeper as the wire mesh above the crawl space keeps the bees from exiting the hive through the feeder. The drawings assume 3/4″ lumber.
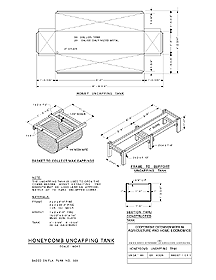
Honey Extracting Equipment
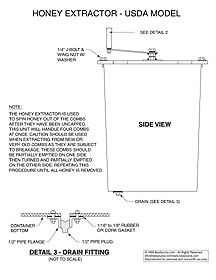

This 4 frame honey extractor was originally designed by a joint effort of the Pennsylvania State University and the United States Department of Agriculture in 1979. This set of plans consists of 3 pages.
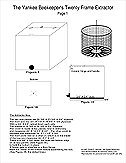
This extractor design is by Dave Verville and is called the Yankee Beekeeper’s 20-Frame Extractor. It contains 9 pages of drawings and detailed instructions.
The reason I made this bar was due to the lack of pillow block adjustment when using the Maxant Chain uncapper. The uncapper I bought from Maxant, although very good and well engineered, lacks the ability to adjust the distance between the flailing chains. The factory holes do not allow the chains to be moved in either direction, thereby causing all the frames to be uncapped to the same dimensions. This is a problem for those of us that run our honey supers with nine frames. Our frames are wider than those who run 10 frames per super. From the factory, my uncapper removed the cappings and about 1/2″ of the comb from both sides. Although this increased my wax yield, it cut the comb down to about 1/4 inch. I wanted the chains to remove the capping and then very little of the comb. This bar is made from Stainless steel and installs in less than 20 minutes. – Dave Verville
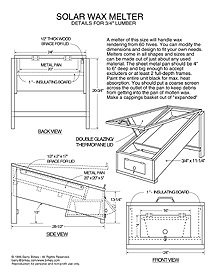

A relatively cheap way to render wax is to use a solar melter. The heat is free and a side benefit is the bleaching of the wax by the sun. The drawing assumes 3/4″ lumber.
This converted chest freezer is an ideal size for heating up five gallon buckets of honey. Ideal for honey that has crystalized and needs re-liquefying, this type of heater will do the job. The freezer used measures 19″ deep by 30″ wide by 28″ high (these are all outside dimensions of the chest not including the lid or base) and is the type used in ice cream shops. Find a size that will work for your needs and that costs little to nothing.
Hive Management
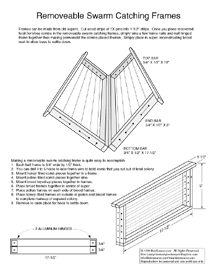

This hinged frame, that opens like a book, is designed to allow easy capture of feral comb that can then be placed into a conventional hive. Designed by Dee Lusby, it’s basically a split frame that is wired on both sides to hold comb in place. Once filled, the ends of the top bar are wired together and placed into a hive.
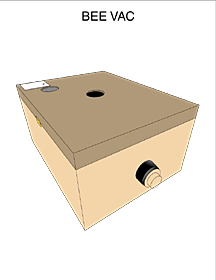
“This idea has saved me hundreds of stings and saved the lives of a lot of bees (I wouldn’t pull feral hives without one). If you’ve ever tried to remove an existing feral hive without a bee-vacuum, I’m sure you’ve sworn off ever doing it again. Try it by vacuuming off the majority of bees first – then remove the comb one by one & vacuum the bees off each comb as you go. With less bees in the air & on the ground you’ll have less of a chance at any unhappy bee-meeting. Plus the bees seem to know they’re in trouble when you vacuum off most of their population – the rest will likely remain extremely timid. At the end of the day you’ll have more salvageable comb (put back into empty frames and tie with cotton string or rubber-bands) cleaner honey (without 1000’s of bee-parts) and a bunch more live bees.”
“The idea behind the ‘bee-vacuum’ is exceptionally simple in design and you’ll have much more fun in retrieving swarms or hives.” – Matthew Westall
Resources from BeeSource


Comments